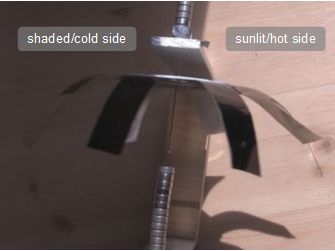
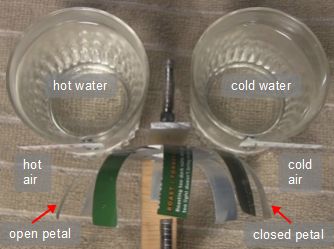
This is a neat heat engine that looks like a flower with petals
that open and close in the heat. The neat thing is that if you
heat only one side of the "flower" then only the petals on that
side open, resulting in an unbalanced wheel. That side falls, bringing
fresh petals into the heat. Meanwhile, the previously heated ones are
rotated to the cool side and close.
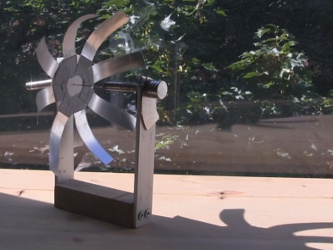
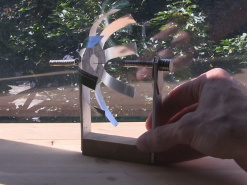
Sunflower heat engine in sunlight.
 |
|
Sunflower heat engine top view.
 |
|
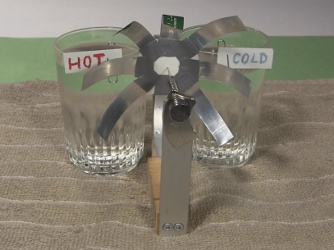
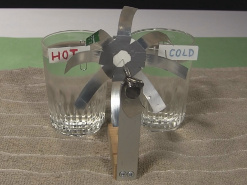
Sunflower heat engine using water glasses.
 |
|
How it works.
 |
|
Video - Sunflower Heat Engine Demos/How it Works
Here's a video showing some demonstrations along with an explanation of
how it works.
How to make the sunflower heat engine
Here's how to make the sunflower heat engine.
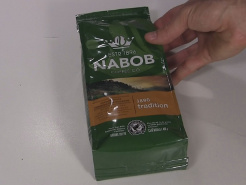
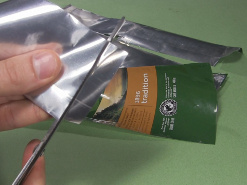
Get a coffee bag. You'll need one
that has a silver colored metal foil on the inside, very likely aluminum.
Luckily I could tell which one was like this in the store by looking at
the top where some of the metal was visible. Not all coffee bags have
this foil inside. The foil is laminated with the plastic outside.
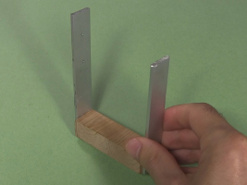
Make some sort of stand for
holding it. The vertical parts of the stand should be made of something
fairly thin and that don't deform easily (they'll hold their shape without
bending easily.) In my case I had some scrap aluminum bars. The
reason for having them be thin is that in step 3 you'll put magnets
on the vertical parts and the magnetic field will have to extend through
them. For that reason they should not be iron or steel since those will
absorb magnetic fields. Basically, if the magnets don't stick to the
parts then they're good to use.
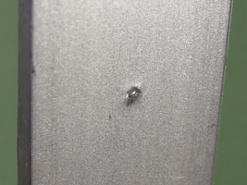
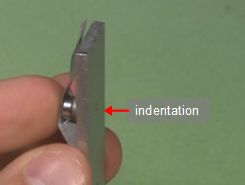
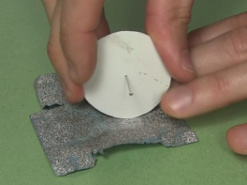
As shown in the photo below
put a small indentation near the top of one vertical support.
You can do this by putting a nail against it and
hitting the nail once or twice with a hammer. It shouldn't be deep.
If you're using wood for your vertical parts then get a small piece of
metal, a metal coin will do, and make the indentation in that. Then
tape that to the vertical part.
Step 1. Get a coffee bag.
 |
|
Step 2a. Make a stand.
 |
|
Step 2b. Make an indentation.
 |
|
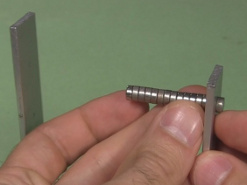
Put magnets on the vertical
parts as shown in the photos below. I'm using neodymium magnets bought
from Home Depot. As shown in the first photo below, on one part
put magnets on both sides. Their attraction is what'll hold them in place.
On the other part the
magnets are one one side only so you'll need to tape them in place.
The magnets should be placed opposite the indention that's on the
other side of the part.
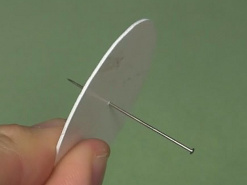
Cut a piece of plastic or sturdy
cardboard in the shape of circle. Mine is around 1 3/8" (45mm) in
diameter. Push a needle through the exact center of it.
Step 3a. Put magnets on one part.
 |
|
Step 3b. Tape magnets to the other part.
 |
|
Step 4. Plastic disk and needle.
 |
|
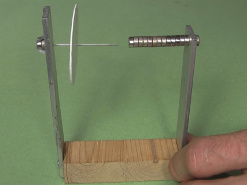
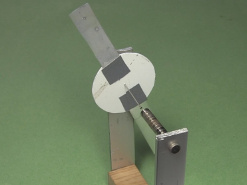
Suspend the disk on the stand
as shown in the photo below. The sharp point of the needle should go
in the indentation you made in one vertical part. Both ends of the needle
will be attracted to the magnets you'd put on both parts. There should
be a gap between the blunt end of the needle and the magnets nearest it.
You'll need to play around with how many magnets you use and what sized
ones until you get the needle suspended as shown.
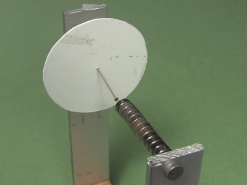
This is the first of a few
balancing steps. Rotate with disk and whatever orientation you rotate
it to, it should stay that way. If it doesn't, and instead rotates
and always stops in the same position, then make a note of which part
of the edge is lowest and sand away some of the material from that
edge. Keep doing this until the disk stays at whatever orientation
you rotate it to.
Step 5. Suspend the disk.
 |
|
Step 6. Unbalanced disk.
 |
|
Sanding the disk.
 |
|
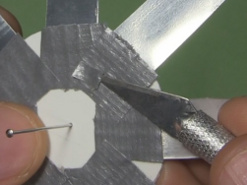
Cut eight strips from the coffee
bag around 1/2" (13mm) x 2 1/8" (55mm). Try to make them all close to the
same dimensions.
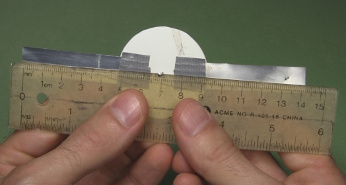
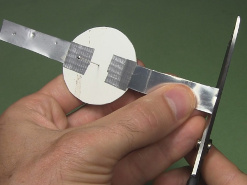
Use a small piece of tape to
tape two of them to the disk. Use a ruler to test that their outer
edges are both the same distance from the needle.
Step 7. Cutting a strip for a petal.
 |
|
Step 8. Taping strips to the disk.
 |
|
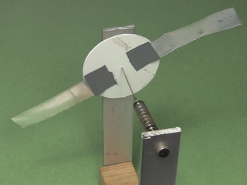
As shown below, suspend what
you have so far on the stand. Again, do some balancing. If the same
strip always wants to hang down then trim it a tiny amount. Another
thing you can use is trim a bit of the tape for that one. You're basically
trying to get the mass on both sides to be the same. Keep working on it
until the disk stays in whatever orientation you put it, which at this
point is ideally with both strips horizontal. As you can see in the
photo below, I got it fairly close.
Step 9. Unbalanced petals.
 |
|
Trimming a petal.
 |
|
Balanced petals (more or less).
 |
|
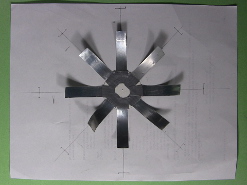
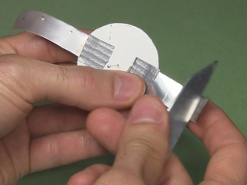
Add all the rest of the strips,
as shown below. I used a piece of paper with eight lines coming out
of the center, meaning that each two consecutive lines are 45 degrees
apart, to help space them out evenly.
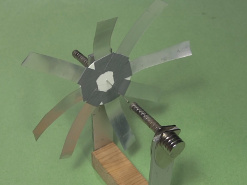
Suspend the result on the stand.
You may have to add more magnets, as I did, due to the added weight.
For the last time, you
need to do some more balancing. One particular section of petals will
again rotate to the bottom always. To counteract that cut a small piece
of tape and tape it somewhere to the opposite side of the disk. You'll
have to experiment with how much tape to put and exactly where to put it.
Work on it until the whole thing sits in whatever orientation you put it.
Step 10. Adding more strips.
 |
|
Step 11. All 8 strips suspended.
 |
|
Step 12. Adding a piece of tape.
 |
|
Carefully curl each petal.
The photo below shows when I did it while there were only two petals.
I do this using the blunt side of a pair of scissors. Hold the petal
between your finger and the scissors and gently squeeze as you pull
along the length of the petal from the inside to the outer edge.
The scissors should be on the metal foil side, resulting in the
petal being curled toward that side.
Try it out. You want to heat
one side of the petals while either cooling the other side or just
letting that side cool by not being in the heat.
If you don't have sunlight then you can use glasses of
hot and cold water as shown below and at the top of this page. Just have
the petals be as close to the glasses as possible without touching.
The hot and cold air surrounding the glasses will do the work.
But if you do have sunlight, as shown below put one side in sunlight and
the other side in shade. The result looks awesome!
Step 13. Curling petals.
 |
|
Step 14. Trying it out.
 |
|
Or, put it in shade and sunlight!
 |
|
Video - How to Make Sunflower Heat Engine using Coffee Bag
The following video shows step-by-step how to make this sunflower
heat engine using a coffee bag.

