Photoelectric effect experiment and how it works
The photoelectric effect is an effect where electrons are emitted from certain materials when light of a certain minimum wavelength arrives at the material.
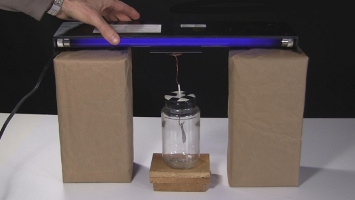
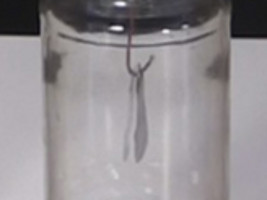
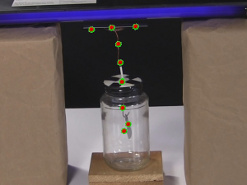
For example, as shown below, a typical experiment in science demonstrations is to shine ultraviolet light on a zinc metal plate and observe that electrons are emitted from the zinc. The effect is observed by its affect on the charged leafs of an electroscope. The leafs start out being charged and spread apart, but after 2 minutes and 26 seconds the photoelectric effect has discharged the leafs and they're together again.
How the photoelectric effect works
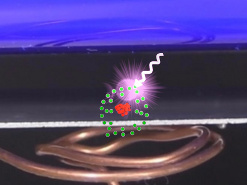
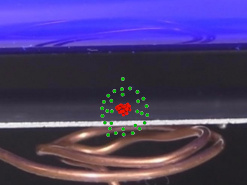
A photon is emitted from a light source to a metal plate (see photos below.) Photons are electromagnetic waves and have a specific wavelength and that wavelength indicates how much energy the photon has. The shorter the wavelength, the greater the energy.
For the photoelectric effect to happen, the photon must have enough energy to overcome the work function of whatever atom the metal is made of plus some extra energy. The work function is the amount of energy needed to break the electron free of the atom. Different atoms have different work functions (required amounts of energy.) Zinc's work function is 4.3eV (eV stands for electron volt and is a unit of energy.)
But if the photon had only that amount of energy then the electron would just fall back into the atom afterward. The photon also has to give enough extra energy to the electron so that the electron will have enough kinetic energy to actually move away. So the photon's total energy must be equal to zinc's work function plus at least some extra energy to give the electron enough kinetic energy to move away.
For our experiment we used a UV (Ultraviolet) fluorescent lamp which gives off mostly UV-A light but also a little UV-B. UV-A and UV-B are just names for two different ranges of wavelengths that light can come in. Photons in the UV-B range have enough energy for zinc to be used in the experiment. UV-B light is light whose wavelength is somewhere in the range 280nm to 315nm (nm is nanometers) which equates to energy of 3.94eV to 4.43eV. Notice that above I said zinc's work function is 4.3eV, which is in the UV-B's range. i.e. When a UV-B light with an energy of 4.43eV arrives at a zinc atom, 4.3eV of it will go to freeing an electron from the atom with 0.13eV left over for the electron to move away (4.43eV - 4.3eV = 0.13eV).

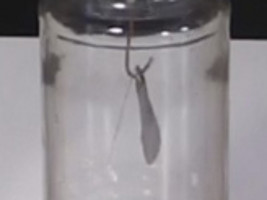
Why do the leafs of the electroscope come together? As talked about below in the description for how to do the experiment, before turning on the UV lamp you first inductively charge the electroscope such that it has a negative charge (see photo below) meaning that there are more negative electrons on the electroscope than positive protons. That causes the leafs to be spread apart. Then, as just stated above, after you turn on the UV lamp, the photoelectric effect removes electrons from the metal plate which is in contact with the electroscope, thereby removing electrons from the electroscope. If you wait long enough all of the extra negative electrons will be removed and since the electroscope will no longer be negatively charged, the leafs will come back together again.
How to do the photoelectric effect experiment
To do this experiment you'll need an electroscope as shown in the photo below. See this page for how to make your own electroscope that's easy to make and can be made from things around the house.
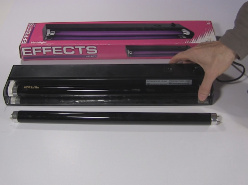
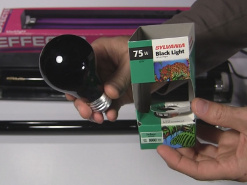
You'll also need a UV fluorescent lamp, these are commonly called black lights or black light fluorescent tubes. I got mine from a yard sale and I was told they were originally bought from Home Depot. I also found light bulbs that looked like incandescent light bulbs that were labeled as black lights but the one I bought didn't work.

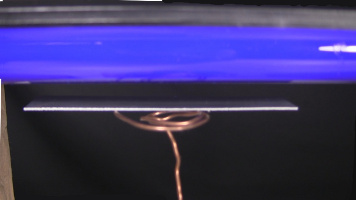
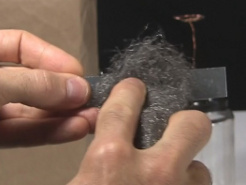
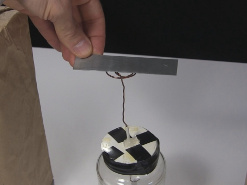
Zinc metal plates can be ordered online from websites that sell science supplies. As shown in the photo below, use steel wool or a very fine sandpaper to remove the very thin layer of zinc oxide from the side of the plate that will be facing the UV lamp. You'll need to do this each time before you run the experiment since zinc oxide is always forming on the plate as long as its exposed to air.
Put the metal plate on top of the electroscope's terminal. If you're making an electroscope using the instructions at the link I gave above then you can simply bend the thick metal wire going to the terminal in order to make a place for the plate to sit on.
Put boxes or stacks of books or something on a table such that you'll be able to put the UV lamp's bulb very close to the electroscope's terminal, as you see in the photos on this page. The closer it is the faster the effect will take place.
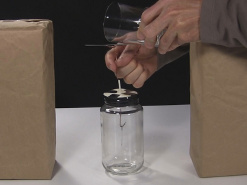
Inductively charge the electroscope such that it will be negatively charged. I used a clean drinking glass and a piece of vinyl from a window blinds for that. See this page on how to inductively charge an electroscope for more on that. At this point the electroscope's leafs should be spread apart since it's charged.

Put the UV lamp in place and watch the electroscope's leafs slowly move back together as electrons are emitted from the electroscope, discharging it and making it no longer negatively charged. Note that this took mine 2 minutes and 26 seconds to do so you may not actually notice the leafs moving. How long this takes depends on the rate at which your UV lamp is emitting photons with sufficient energy.
If the leafs don't move at all after around 10 minutes then try moving the UV lamp's bulb closer to the zinc plate and try again. If it still doesn't work then go back to electroscope page to see how to test if your electroscope works at all by bringing charged objects near the terminal. If there's nothing wrong with your electroscope then it may be that your UV lamp is one that doesn't emit enough light in the UV-B range to make a noticeable difference.
Video - The Photoelectric Effect and How it Works
Here's a video showing the experiment being done and an animation showing how the photoelectric effect works.
